New to GPS apps? Here a few topics to get you up to speed. Click on the links to view each topic.
GPS Basics - How Your Smartphone Knows Where You Are
GPS App Components - Maps and Markers
GPS App Components
Here are the main components used for guided hikes.
Tracks
Most GPS apps allow you to record a track as you are taking a hike. A track is a “breadcrumb” trail showing the path the user took on his hike or other outdoor activity. While recording a track, the app will create a trackpoint at set intervals (defined by time or distance). The trackpoint will contain information about your current position, elevation, and other data. The app then connects these trackpoints in chronological order (start to finish) in order to show the path. Given that the trackpoints contain fairly precise GPS coordinates, this track can then be overlaid on a map for further reference, as shown in the screenshot below. One can also save the track for later use. This might involve documenting your hike or sharing your hike with another person. Our guided hikes use tracks recorded earlier to show you the way.
Example of a Track
Markers
Trackpoints are created automatically by the app once the user asks it to record a track. Markers are created by the user as they move through the landscape. These are typically shown as pins denoting a specific spot on or near the trail, as defined by their latitude and longitude coordinates. They are used to locate specific points of interest along the way, such as a trail intersection, a scenic view, or a natural or manmade feature of the area. The user normally provides a title and description of the marker to help identify it. Markers are typically stored with a specific track to create a complete picture of the user’s trip. Shown below is an example of marker icons shown on a map, together with the associated track.
Example of Markers
Marker Types
While most GPS apps allow for the creation of waypoints, they may vary in the types of waypoints they support. This could include:
- Basic Waypoint – A simple flag with a title and short description.
- Note – Similar to the basic waypoint, but allowing for much longer text descriptions
- Photo – Uses the smartphone camera to take a photo at a specific location and then geo-locate it as part of the track.
- Audio – Records audio and geo-locates it.
- Video – Uses the smartphone camera to record a video and geo-locate it.
Routes
As noted earlier, tracks generally refer to paths that you (or others) recorded during a hike. Routes, on the other hand, generally refer to hikes you plan to take. Prior to the hike, you might download another user’s trip to use as a guide during the hike, or create a route from scratch using an on-line trip planner. During the hike, you would refer to the route you created as you travel, following the path on the map.
Trips
Trips are “folders” that contain the track(s), route(s), markers, and narrative (if any) associated with a given user’s actual or planned outing in the great outdoors. Trips can normally be viewed as a collection of items on a map, or as a narrative document containing the various media files. Together, these items provide a sort of personal scrapbook for the trip, using tracks and markers to document the places the user visited (or plans to visit) during a single hike or other outdoor adventure. Our guided hikes are trips we documented for others’ use.
Navigating Trails in the Great Outdoors
Finding Yourself on a Map
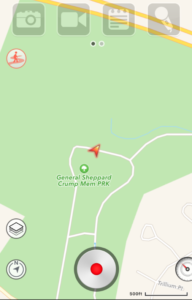
GPS apps all come with one or more maps covering the United States and (usually) the world. They know your current location and, by default, show it to you on a map. As shown in the screen shot below, your location is usually shown by an arrow pointing in the direction you are facing. As you move, the location arrow moves, always updating your current location.
Using a Map to Navigate
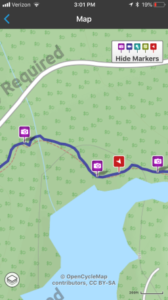
Most GPS apps use a street map like Google Road as the default map. These maps usually show only streets, excluding most off-road trails. However, you can often select a different map for display, one that includes trails. Examples include OpenCycle or Thunderforest Outdoors. In the screen shot below, the user is following a trail in a local park. The user simply ensures that the current location marker stays near the trail as he/she walks.
Using a Route to Navigate
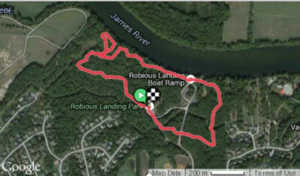
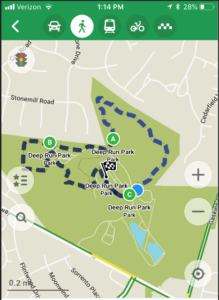
Often, a user will want to combine a set of trails in a given park for his/her walk. This requires the user to plan the walk ahead of time. Many GPS apps allow you to create a route from existing trails on a map, which you can then follow while hiking. This is similar to street routes you can create within Google Maps or other GPS devices used for car navigation. Depending on the app, this route planning can be done within the app itself, or on a companion Web site (for download to the app). The screen shot below shows a rudimentary route created in Maps.Me. Route planning will not be covered in this discussion, as it is assumed that beginning users will prefer to use prerecorded tracks for greater simplicity (see next section).
Using a Track to Navigate
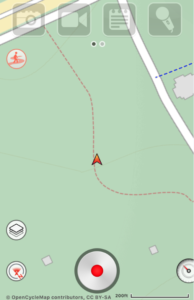
Most maps for smartphone GPS apps include only a limited number of trails, and the paths shown tend to be only rough approximations of the actual trail course. To improve the accuracy of the trail path or walk trails that are not included on available maps, one can use a prerecorded track. This is a path that has been recorded by another GPS user that has walked the trail and then made the track available for download by other users. An example of a prerecorded track is shown below. The process for downloading a track to your smartphone is described elsewhere. Once you have the track on your phone, it will appear on the map for the trail location, and you use your location marker to stay on the track as you walk. Our site has hundreds of these tracks available.
Using a Guide to Navigate
One disadvantage of using the basic tracks described above is that they provide little information about the trail itself and the surrounding environs. Guided hikes fill this gap by adding waypoints and narrative for the hike, helping you to navigate and explore the park.
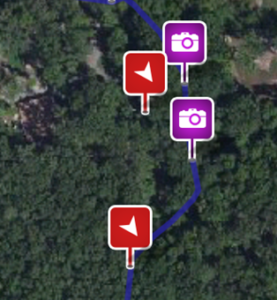
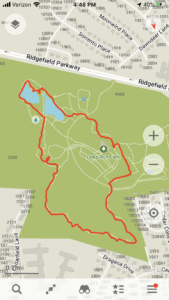
The screenshot below shows part of a guided hike as it appears on one’s smartphone – the icons along the track are waypoints that contain additional information about each specific location. If one taps any icon on the screen, another window will pop up for that waypoint. The second screenshot shows the added information for a waypoint. By opening these waypoints as one approaches them on the map, one can learn more about the hike. One can also review the hike prior to your trip by accessing hike information on our Web site. An example of this approach can be seen by using this link: View Hike. Our site has more than a hundred guided hikes from which to choose.